
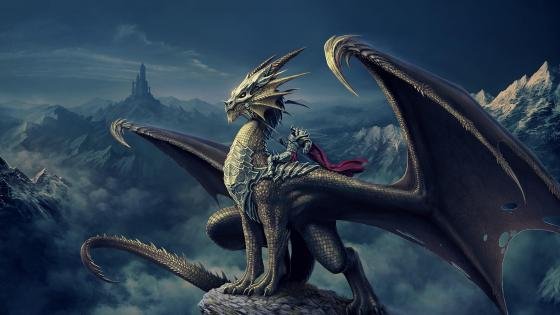
Drawing:5z_boyjkm98= Dragon has long been a favorite subject for artists of all skill levels. The mystical and powerful nature of dragons makes them an exciting and challenging subject to bring to life on paper. Whether you’re a beginner or an experienced artist, mastering the art of drawing a dragon can be a rewarding endeavor. This guide will take you through the steps, techniques, and tips needed to create a stunning dragon drawing, focusing on the keyword “drawing:5z_boyjkm98= dragon.”
Understanding Drawing:5z_boyjkm98= Dragon
Basic Structure of a Drawing:5z_boyjkm98= Dragon
Before you start drawing:5z_boyjkm98= dragon, it’s crucial to understand its basic anatomy. While dragons are mythical creatures, they are often depicted with a combination of features from real animals such as reptiles, birds, and mammals. This section will explore the essential elements like the head, body, wings, and tail, helping you to visualize and construct your dragon’s form.
Head and Facial Features
The head of a dragon is one of its most distinctive features. Depending on the type of dragon you want to draw, the head can vary significantly in shape and size. This section will guide you through drawing different styles of dragon heads, from fierce and aggressive to wise and ancient. We’ll cover essential elements like the eyes, nostrils, teeth, and horns.
Wings and Their Structure
Dragon wings are often based on the anatomy of bat wings, with a membrane stretched over a skeletal structure. Understanding the bones and joints in dragon wings is key to drawing them realistically. This section will break down the wing structure and provide tips on how to make your dragon’s wings look dynamic and powerful.
Tail Design
A dragon’s tail can be simple or highly elaborate, depending on the style you choose. The tail is often used to balance the dragon’s body and can also serve as a weapon in your drawing. This section will explore different tail designs, from sleek and serpentine to spiked and armored.
Step-by-Step Guide to Drawing:5z_boyjkm98= Dragon
Sketching the Outline
Start your drawing:5z_boyjkm98= dragon with a rough outline. Using basic shapes like circles, ovals, and triangles can help you map out the dragon’s proportions. This step is crucial for establishing the overall pose and ensuring that all the parts of the dragon are in harmony.
Adding Details to the Head
Once you have the outline, focus on the dragon’s head. Begin by refining the shape, then add the eyes, nostrils, and mouth. Pay close attention to the expression, as this will set the tone for your entire drawing. This section will also cover how to draw horns, scales, and other details that can make your dragon’s head stand out.
Drawing the Body and Limbs
Next, move on to the dragon’s body and limbs. The body should be muscular and powerful, with well-defined lines that suggest strength. The limbs can vary; some dragons have two legs, while others have four. This section will guide you through the process of drawing the body and limbs, ensuring they match the dragon’s overall style.
Shaping the Wings
After the body is complete, focus on the wings. Use light strokes to sketch the skeletal structure of the wings, then gradually add the membrane. Wings can be tricky, so take your time to ensure they look natural and proportionate to the body. This section will provide tips on how to make the wings appear realistic, even in different poses.
Finalizing the Tail
Finish the dragon’s outline by detailing the tail. Depending on your dragon’s style, the tail can be thin and whip-like or thick and heavy. Add any additional features like spikes or fins to complete the look.
Adding Depth and Texture
Shading Techniques
Shading is essential for bringing your dragon to life. It adds depth and dimension, making the dragon appear more three-dimensional. This section will cover various shading techniques, such as hatching, cross-hatching, and blending, to give your dragon a realistic look.
Texturing the Scales
Dragon scales are a defining feature and can add a lot of detail to your drawing. Depending on the type of dragon, scales can be smooth, rough, large, or small. This section will guide you through different techniques for drawing and shading scales, making your dragon’s skin look lifelike.
Highlighting and Contrasting
Adding highlights and contrasts can make your drawing:5z_boyjkm98= dragon pop. This section will show you how to use highlights to accentuate the dragon’s features and create a dynamic contrast between light and shadow, giving your dragon a more dramatic appearance.
Tips and Tricks for Drawing:5z_boyjkm98= Dragon
Choosing the Right Tools
The tools you use can significantly impact the outcome of your drawing. This section will discuss the best pencils, erasers, and paper types for drawing:5z_boyjkm98= dragon We’ll also cover the advantages of using digital tools like tablets and drawing software.
Practicing with Reference Images
Using reference images can help you improve your drawing skills and give you ideas for different drawing:5z_boyjkm98= dragon. This section will provide tips on how to find and use reference images effectively, helping you to create a more accurate and detailed drawing.
Experimenting with Different Styles
Dragons can be depicted in various styles, from realistic to cartoonish. This section will encourage you to experiment with different styles to find what suits you best. Whether you prefer a traditional approach or something more modern and abstract, this section will inspire creativity.
Conclusion
Drawing a drag, especially with the focus keyword “drawing:5z_boyjkm98= dragon,” is an exciting and creative process that allows you to express your artistic skills. By following the steps outlined in this guide, you’ll be able to create a detailed and impressive drawing:5z_boyjkm98= dragon. Remember to practice regularly, experiment with different techniques, and most importantly, have fun with your art.